Its not too difficult to get the hang of Google Earth. The planet is draggable and you can easily adjust the viewing angle and zoom using the controls on the top right. Zoom can also be achieved using the scroll wheel on your mouse. To instantly fly to and zoom into a location, type the name in the entry field in the Search panel on the top left of the screen.
On the bottom left in a box titled Layers, you can toggle several of Googles premade markers, from places of interest to weather.
Basics
Loading KML Files
1. Run GoogleEarth.
2. File > Open your .kml file created above. This loads the file into your Temporary Places folder. It is called GPS device and contains Waypoints and Tracks.
3. Right-click on GPS Device, and select Rename to rename your track.
4. Click on the + symbol to expand the file and view the Waypoints and Tracks.
5. Your waypoints are numbered sequentially starting with 00001. To rename them, right-click and select Rename.
6. Save this track as a .kmz by selecting it, clicking on File > Save > Save place as
To organize multiple tracks that relate to a single thing (e.g. walking paths to the hospital), it is convenient to create a folder.
1. Right-click on Temporary Places > Add > Folder.
2. Right-click on the folder and select Properties
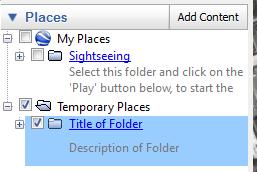
3. Rename your folder, and add a description. This description will show up underneath the folder:
4. Drag your track into the folder.
5. Save folder by selecting it, and following step 7 above.
2. File > Open your .kml file created above. This loads the file into your Temporary Places folder. It is called GPS device and contains Waypoints and Tracks.
3. Right-click on GPS Device, and select Rename to rename your track.
4. Click on the + symbol to expand the file and view the Waypoints and Tracks.
5. Your waypoints are numbered sequentially starting with 00001. To rename them, right-click and select Rename.
6. Save this track as a .kmz by selecting it, clicking on File > Save > Save place as
To organize multiple tracks that relate to a single thing (e.g. walking paths to the hospital), it is convenient to create a folder.
1. Right-click on Temporary Places > Add > Folder.
2. Right-click on the folder and select Properties
3. Rename your folder, and add a description. This description will show up underneath the folder:
4. Drag your track into the folder.
5. Save folder by selecting it, and following step 7 above.
Placemarks
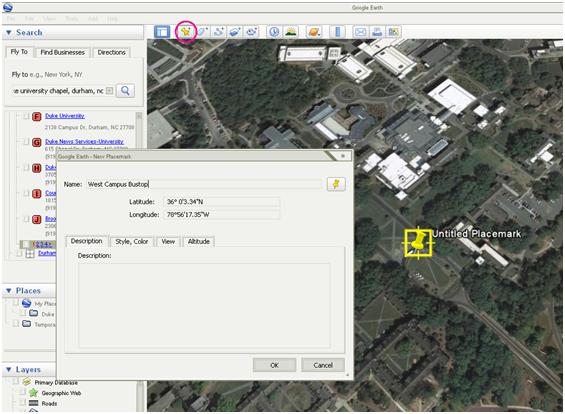
To add your own markers, first click on My Places in the Places panel and then use the buttons in the top toolbar. For a simple placemark, click the button, type in the name, and drag the yellow box (or type in a latitude and longitude) before clicking Ok:
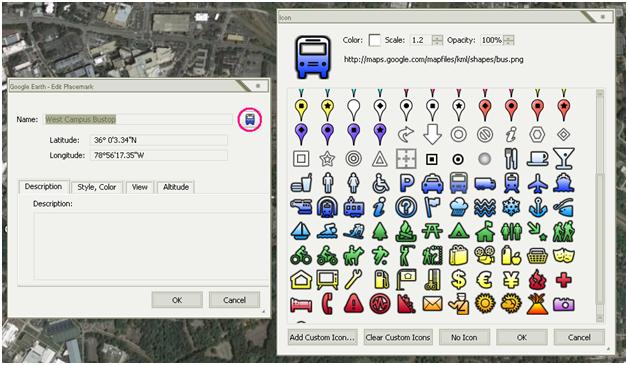
You can change the icon of the placemark by clicking the button shown below:
You can change the icon of the placemark by clicking the button shown below:
Shapes
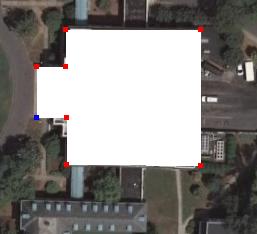
1) Select the Add Polygon tool on the top toolbar or press Shift+Ctrl+G to create a new shape.
2) Click directly on the map to create the border for the shape. You can adjust each point after placing it by clicking and dragging each square.
3) After creating the shape, the properties can be changed to customize colors and size. The first tab allows a description and name to be entered, which will be displayed in Google Earth when the shape is selected.
4) The next tab controls the color of the new shape. The colors can be selected for the lines and fill and the opacity can be controlled as well to make the shape more or less transparent in either two or three dimensions.
5) The last tab is the last one to use for customization. Controlling the altitude allows shapes to be used for representing quantitative data. Altitude can be manually entered or added through the slider. The setting should also be Relative to ground in order to control for the altitude of the ground. To create a three-dimensional shape, select the Extend sides to ground checkbox. Click OK to create the shape.
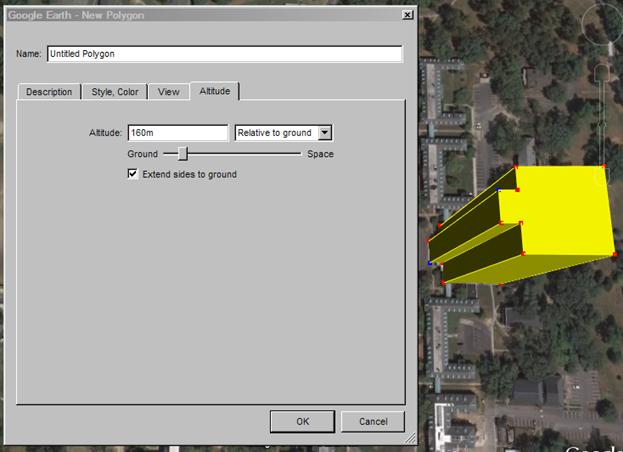
6) After creating the shape, it will be displayed in the My Places folder of Google Earth with the Name and Description visible. From here it can be edited further and can be navigated to like any other landmark.
2) Click directly on the map to create the border for the shape. You can adjust each point after placing it by clicking and dragging each square.
3) After creating the shape, the properties can be changed to customize colors and size. The first tab allows a description and name to be entered, which will be displayed in Google Earth when the shape is selected.
4) The next tab controls the color of the new shape. The colors can be selected for the lines and fill and the opacity can be controlled as well to make the shape more or less transparent in either two or three dimensions.
5) The last tab is the last one to use for customization. Controlling the altitude allows shapes to be used for representing quantitative data. Altitude can be manually entered or added through the slider. The setting should also be Relative to ground in order to control for the altitude of the ground. To create a three-dimensional shape, select the Extend sides to ground checkbox. Click OK to create the shape.
6) After creating the shape, it will be displayed in the My Places folder of Google Earth with the Name and Description visible. From here it can be edited further and can be navigated to like any other landmark.
Paths
Create paths using points. Make a straight line with two points or drag your mouse and adjust points for a curvy path:

Saving
Markers can be edited at any time by right clicking on them in the left panel and selecting Properties.
To save your map, create a folder in My Places by right clicking and selecting Add>Folder. Drag your markers into this folder. Then, right click on the folder and select Save Place As... You will be given the option to save as a .kmz or .kml. Either one works.
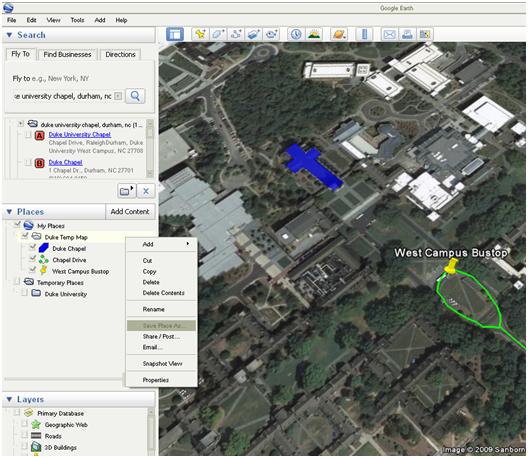
Now you can share your file with others or re-open it later.
To save your map, create a folder in My Places by right clicking and selecting Add>Folder. Drag your markers into this folder. Then, right click on the folder and select Save Place As... You will be given the option to save as a .kmz or .kml. Either one works.
Now you can share your file with others or re-open it later.
Merging Multiple KML/KMZ Files to Create a Toggling Map
If you have several kmz or kml files created through Google Earth or other resources, you can merge them using the following steps:
1) Go to File>Open and select the kmz or kml files you wish to merge. They will show up in your Temporary Places folder.
2) For better organization, create new folders and drag markers into them. Rename current folders. Make sure all your folders are within one main folder. For example, go from:
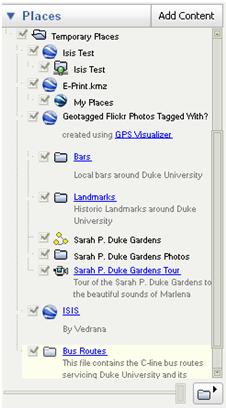 to:
to: 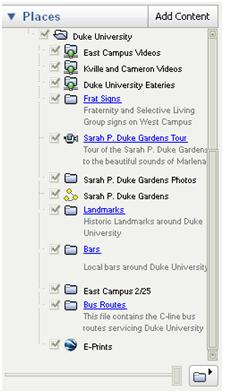
3) To save your big file, right click on your main folder (Duke University in this example) and select Save Place As...
4) Pick a name for your file and youre done!
1) Go to File>Open and select the kmz or kml files you wish to merge. They will show up in your Temporary Places folder.
2) For better organization, create new folders and drag markers into them. Rename current folders. Make sure all your folders are within one main folder. For example, go from:
to: 3) To save your big file, right click on your main folder (Duke University in this example) and select Save Place As...
4) Pick a name for your file and youre done!
Printing and Saving Images in Google Earth
Saving an image in Google Earth will allow you to preserve the current view that you are seeing in the program. Printing will allow you to do that as well, but you can also print out the information and descriptions contained in an individual layer of a map.
Images:
To save an image, select Save Image from the Save selection in the File menu or press Ctrl+Alt+S. Depending on whether or not you are using the Pro version or not, you may or may not have the option to select the resolution of the image that you would like to save.
Printing:
When selecting Print from the file menu or pressing Ctrl+P, you will bring up this dialog box which will allow you to select which type of printing you want to do.

If you wish to print the view in the same way that you save an image, select the first option and your desired resolution setting.
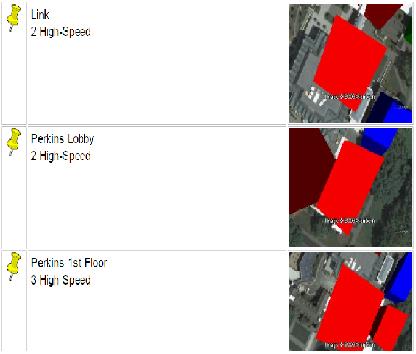
You can print out the details of one of the layers of a map by selecting the last option. This will print a small picture of the location of a placemark along with any descriptions attached to it.
Please be aware that printing in Google Earth will take a long time, especially at high resolutions. Do not attempt to work in other programs while printing is occurring.
Images:
To save an image, select Save Image from the Save selection in the File menu or press Ctrl+Alt+S. Depending on whether or not you are using the Pro version or not, you may or may not have the option to select the resolution of the image that you would like to save.
Printing:
When selecting Print from the file menu or pressing Ctrl+P, you will bring up this dialog box which will allow you to select which type of printing you want to do.
If you wish to print the view in the same way that you save an image, select the first option and your desired resolution setting.
You can print out the details of one of the layers of a map by selecting the last option. This will print a small picture of the location of a placemark along with any descriptions attached to it.
Please be aware that printing in Google Earth will take a long time, especially at high resolutions. Do not attempt to work in other programs while printing is occurring.